Curbless Entry Walk-in Showers
Here is a few curbless entry showers that I have recently completed. I start the process of creating the entry by properly "dropping" the subfloor, which does not involve cutting into floor joists or compromising the structural integrity in any way. In fact, my process actually adds to the overall strength and weight capacity to the shower area. Once the floor is dropped down, I then build a single slope traditional style shower receptor (mudpan) with a bonded drain, at this point the area is ready for tile. A curbless entry makes the shower area easily accessable and if a linear drain is used it opens up the option of using a super format tile throughout the entire bathroom area.

Master Bathroom "Wet Area"
Here is a master bathroom with a dropped subfloor shower and a raised area behind to accomidate for a freestanding bathtub and faucet. The large tinted window with a great view makes this bathroom truely unique. The main floor got in-floor heat wire ran throughout and then dammed off and a heat rated self leveler pour encased the wire. With that elevation established, I packed in 16 bags of sand topping mix for the raised area which would later have a freestanding bathtub installed. I put a small slope on this area so any water would properly drain into the shower area and make its way to the shower center drain. With the main floor substrate leveled and the tub area dry pack had cured up with a slight slope yet 2.5" above the main floor, I could pack in the shower base with a bonded drain and a screed coming off the main floor self leveler. Ready for tile is a curbless entry into a "wet area" with a raised platform ready for freestanding bathtub and faucet.

Guest Bathroom
Here is the guest bathroom at the same residence as the photo to the left. A dropped subfloor curbless entry with center drain. This install was done with the Hydroblock shower system with a bonded center drain foam Hydroblock pan custom cut to size and Hydroblock wall board all bonded together with Hydroblock joint sealant. The 12"x24" floor tile stopped at the entry and the pan got a 2" square mosaic tile. at the smooth entryway transition, the single grout line got a color matching silicone caulking for a movement joint.

A.D.A.
Here is a shower/bathroom that I built with the clients specific needs in mind. The subfloor was dropped and a center square tileable top drain was installed. A 1.5" hex porcelain tile got installed throughout the entire bathroom and shower area and the pan was built with as minimal slope taken as the client would be entering the area in a wheelchair. This was an extensive project, see photos from start to stop work in "Bathroom remodel & More" section.

Extra large
Here is one of the first curbless entry showers that I constructed. This particular shower was new construction so the dropped subfloor was built into the home plans. Nonetheless, the large format tile continued from the bathroom floor into the shower and sloped to the linear drain. The substrate got Schluter Ditra which allowed for this bathroom to have in-floor heat ran throughout the entire space including the shower. The main floor area was dammed off and a heat rated self leveler was poured and properly skeed. The materials used to dam the pour was removed and the Ditra and heat wire sloping in the shower to the drain got encased with Schluter all-set mortar allowing the slope to maintain and protect the heat wire. The walls then got individually cut tile to make the chevron patterned 11 ft. walls.

Italian blue
Here is another center drain curbless entry walk-in master bathroom shower. The wall tile was hand made in Italy which took 9 months to recieve. With the wall tile on a straight stack pattern and frameless glass installation makes for a simplistic and visually pleasing bathroom, not to mention the freestanding soaking tub and faucet to tie this space together.

Variety of Bright White Ceramic
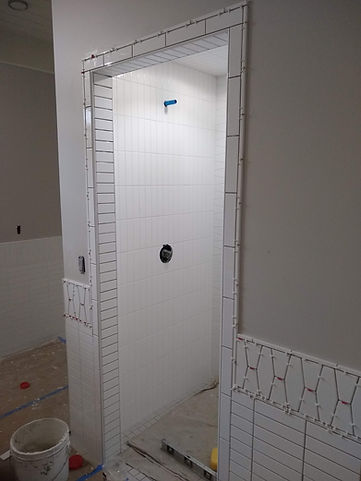
Here is a curbless shower area being constructed and almost done at this point. The entire bathroom was done using different shaped and sized bright white ceramic tile, the 2"x9" got a straight stack the stretched diamond got every other tile cut in half then stacked ontop itself, and all got outlined and capped off with a pencil liner

Whats under the tile?
Here is a perfect example of what it looks like underneath the final layer, the unlimited selection of tile. This is a bathroom that is currently under construction, I used the Kerdi fabric system on this install. After installing a traditional style shower receptor (mudpan) of a single slope with a bonded Schluter Kerdi-line drain, Kerdi fabric was installed over every square inch from shower pan up to 11 ft. ceilings, covering the shower pan and out of the shower area to cover the entire rest of the bathroom floor where I installed 1/4" cement board to achieve the same height of the hardwood that will be installed throughout the rest of the house for a seamless transition at the bathroom entryway. Kerdi is a waterproof fabric and when installed correctly, not only will the homeowner recieve a 20 year warranty from Wauna Tile, but, once registered, will also recieve a limited lifetime warranty from the manufacturer (Schluter) for materials AND labor on the entire installation.
Satisfaction Guarantee
If for any reason you're not satisfied with my craftmanship when my final punchlist is complete, and I "hand over the keys" to you're new bathroom/shower/tile install, I will remedy and rework anything you don't like until you are completely satisfied.